EP-Launch

This document provides an introduction to EP-Launch, a Quickstart guide for users, and setup instructions for developers.

The code for EP-Launch is hosted on Github. Known issues are on the Issue Tracker.

What is it?

EP-Launch is a tool that has been distributed with the EnergyPlus building simulation engine for decades. It was originally written in Visual Basic 6, and has been maintained and updated as a Windows only program. There was also an EP-Launch Lite tool for Mac, but was an extremely minimal tool. Recent pushes to update the tool to become cross platform and adopt a modern programming language led to a major rewrite in 2018. The release of EP-Launch 3.0 in 2018 brings an entirely new codebase and an entirely new tool. While some of the features from the prior EP-Launch have not been integrated yet, the capabilities of the new version have a much higher ceiling.

Starting with EP-Launch 3.0, the tool now runs “workflow” scripts, which are Python classes, instead of relying on run code being hardwired inside EP-Launch. These workflows can be written by users for their own tools, and users can modify the existing ones in an EnergyPlus installation. This allows users to adjust the way EnergyPlus or other tools run in EP-Launch without needing an understanding of VB6 and a VB6 compiler. The workflows have their own documentation here Workflows.

In addition, a new feature of EP-Launch 3.0 is the use of caching. When a workflow is started, a small json file is created in that working folder. Initially that json file contains input parameters that define that run. When a workflow is complete, the background processes update that cache file, and the GUI can refresh with this new data. In the GUI, when you browse to a folder, the cache file in that folder is searched, and if results match the currently selected workflow, the result data is populated. Cache files are a difficult thing to manage considering any number of threads could be trying to access the file as workflows are completed. Users aren’t required to understand all the intricacies for normal operation of the program, but they are documented here: Cache File Operation.

Here are some general highlights of the project for those interested:

Quickstart

To get started, simply:

  • Install EP-Launch, using one of the sections below for your platform/configuration
  • Run EP-Launch, again using of the sections below for your platform/configuration
  • Browse to a folder with an IDF
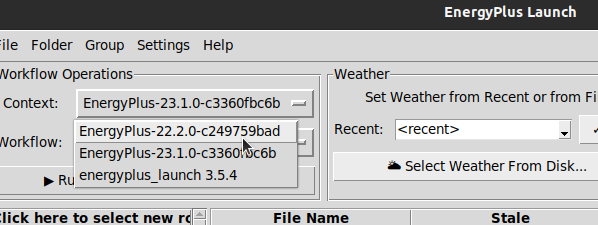
  • Make sure the EPLaunch workflow context is selected (see Figure below)
  • Run the built-in SiteLocation workflow, note a dialog is briefly shown and closed (as the process is nearly instantaneous) and the interface has results in it
  • Browse to a different folder and come back – the data persisted through the cache file
  • Fun experiment: create a “fake” idf and try to run the workflow on that malformed file, note the output dialog stays open with an error

This figure shows the menu location for selecting the workflow version, or context:

image 1

Although EP-Launch is packaged up with some built-in workflows, the power of EP-Launch is exercised through using workflows with external tools. As EP-Launch has historically been geared toward supporting EnergyPlus, this is the natural first starting point. Starting with version 9.0, in September 2018, EnergyPlus will be packaged with workflows for exercising its own utilities. Download and install a version of EnergyPlus with workflows (9.0+) from their Github Release Page.

As of this writing, the EnergyPlus packages will come with workflows for running:

  • EnergyPlus itself (along with pre- and post-processors), in both SI and IP unit conventions
  • The CalcSoilSurfTemp ground temperature calculator
  • The CoeffConv conversion utility
  • The CoeffCheck unit utility
  • The AppendixG post processor

Each platform has a “standard” EnergyPlus installation folder:

  • C:\EnergyPlus-VX-Y-Z on Windows
  • /Applications/EnergyPlus-X-Y-Z on Mac
  • /usr/local/bin/EnergyPlus-X-Y-Z on Linux

If EnergyPlus is installed in a standard location, the EP-Launch tool will be able to find the workflows for that installation. If EnergyPlus is installed in a different location, you can still point EP-Launch to that directory using the Settings->WorkflowDirectories dialog. In the same manner, if workflows are created in a totally unrelated directory, use that same dialog to point EP-Launch to those workflows.

Once workflows have been processed by EP-Launch, they are available in the menu bar in the workflows menu item. On Windows and Linux they are also available in the combobox in the toolbar. On Mac, there is a known issue with this dropdown, so it isn’t available there. Once EP-Launch is ready with workflows, simply select a workflow from the list. The available files in the control file list will filter down to the file extension defined by the workflow. If the workflow is applicable to *.txt files, then only text files in the currently selected file will be shown. As a quick start, browse to the EnergyPlus install folder, into the weather directory. Then select the CalcSoilSurfTemp workflow from the dropdown or menu bar. Select a weather file in the file listing, and click Run in the toolbar or menu bar. The program should start and run instantly, and the column data in the file listing will be updated with output parameters.

Windows Installation and Running

From the release page on EP-Launch, download the appropriate version. Windows installers have a -windows suffix on the file name.

Run the installer, and it will install the program into the appropriate Program Files directory. The installer creates a shortcut icon on the desktop, so click that to run the program.

Known issues on Windows:

  • The installer is extremely minimal and needs to have options for install path, uninstallation, etc.
  • The install path may be in some cases nested deep inside the Program Files directory. This doesn’t affect the program, but looks funny.

Mac Installation and Running

From the release page on EP-Launch, download the appropriate version. Mac packages have a -mac suffix on the file name.

The download file will be a tar.gz archive, locate that in Finder and double click to extract it. There will be an EP-Launch.app file in that folder (It may have the version number in the filename). You can simply double click that file to run the app from there. You can optionally copy that app bundle into your /Applications directory to complete the “installation”.

Known issues on Mac:

  • The workflow dropdown that is available on Windows and Linux is not available on Mac. This is an issue being actively worked on, but not addressed by the time of this writing.

Linux Installation and Running

Key note: Dependency issues and system differences with Linux distributions, and even different versions of the same distribution, make generating packages unreliable. We try to build Linux packages on the oldest reasonable platform, hoping for backward compatibility on newer systems. Our packages are built on Travis using the Trusty (14.04) image. When trying to run this on Ubuntu 16.04 or 18.04, the program works, but the toolbar icons are missing/invalid. This isn’t a packaging problem with the icons, it’s because the Zlib version that libpng depends on is out of date and the newer one has a different API. Even fixing this one dependency problem leads to what seems like an endless list of dependency issues.

Because of these dependency issues, and because Linux users may be more comfortable installing dependencies, the recommendation is for Linux users to set up a dev environment for EP-Launch instead of using the built package. However, if the user is interested in trying out the built packages, the steps are simple.

From the release page on EP-Launch, download the appropriate version. Linux packages have a -linux suffix on the file name.

The download file will be a tar.gz archive, locate that in Files and double click to extract it. Open the extracted folder, and inside the EPLaunch folder, there will be an EP_Launch binary file; run that to open the program.

Development

Setting up a development environment only requires a few steps, and is similar on each platform, but different enough that they are broken into different sections here.

Windows Developer Environment

  • Install Python 3.6+ - Using standard installer packages from Pythons website.
  • Download EP-Launch - From the release page on EP-Launch, download the “Source Code (tar.gz)” link, which is a simple archive of the Github repository - Or, clone the repository if you have Git installed: git clone https://github.com/NREL/EP-Launch - Either way, open your terminal and browse to that folder: cd EP-Launch
  • Set up a virtual environment where the Python dependencies can be installed - This is simple in Python 3, and we’ll place it in a venv subdirectory in the current folder: python3 -m venv .\venv - Then activate it: venv\Scripts\activate.bat
  • Install dependencies: - Almost all Python dependencies are listed in the requirements.txt file, install them: pip install -r requirements.txt - The wxPython library is different depending on many things, and can’t just be listed in the requirements file. - For Linux it’s weird, for Mac and Windows, it’s straightforward: pip install wxPython
  • At this point you should be able to run EP-Launch: - python3 eplaunch\runner.py
  • You can also run the test suite by executing the nose test binary: - nosetests

Mac Developer Environment

  • Install Python 3.6+ - Using Brew or your method of choice
  • Download EP-Launch - From the release page on EP-Launch, download the “Source Code (tar.gz)” link, which is a simple archive of the Github repository - Or, clone the repository if you have Git installed: git clone https://github.com/NREL/EP-Launch - Either way, open your terminal and browse to that folder: cd EP-Launch
  • Set up a virtual environment where the Python dependencies can be installed (assumes bash) - This is simple in Python 3, and we’ll place it in a venv subdirectory in the current folder: python3 -m venv ./venv - Then activate it: source venv/bin/activate
  • Install dependencies: - Almost all Python dependencies are listed in the requirements.txt file, install them: pip install -r requirements.txt - The wxPython library is different depending on many things, and can’t just be listed in the requirements file. - For Linux it’s weird, for Mac and Windows, it’s straightforward: pip install wxPython
  • At this point you should be able to run EP-Launch: - python3 eplaunch/runner.py
  • You can also run the test suite by executing the nose test binary: - nosetests

Linux Developer Environment

These steps assume the developer is installing on the latest LTS version of Ubuntu. If not, the commands might be slightly different, but I will try to point out where those differences may occur.

Simply follow these instructions:

  • Install Python 3 - Ubuntu 18.04, like most Linux distributions, will include an updated version of Python 3 (3.6+), so no need to do anything for that.
  • Download EP-Launch - From the release page on EP-Launch, download the “Source Code (tar.gz)” link, which is a simple archive of the Github repository - Or, clone the repository if you have Git installed: git clone https://github.com/NREL/EP-Launch - Either way, open your terminal and browse to that folder: cd EP-Launch
  • Set up a virtual environment where the Python dependencies can be installed (assumes bash) - This is simple in Python 3, and we’ll place it in a venv subdirectory in the current folder: python3 -m venv ./venv - Then activate it: source venv/bin/activate
  • Install dependencies: - Almost all Python dependencies are listed in the requirements.txt file, install them: pip install -r requirements.txt - The wxPython library is different depending on many things, and can’t just be listed in the requirements file. - For Ubuntu 18.04, the link is: https://extras.wxpython.org/wxPython4/extras/linux/gtk2/ubuntu-18.04/wxPython-4.0.3-cp36-cp36m-linux_x86_64.whl - Note that link contains gtk2, and wxPython offers packages for gtk2 or gtk3 - Note that link contains ubuntu-18.04, and wxPython offers packages for 14.04 and 16.04 - Note that link contains wxPython-4.0.3, and wxPython offers packages for 4.0.2 (and probably others) - Note that link contains cp36, for Python 3.6, and wxPython offers packages for Python 2.7 as well - Adjust the link and browse around that site to find the right version for your system - Once you have the right one, install it into your virtual environment using: pip install <the link you made>
  • At this point you should be able to run EP-Launch: - python3 eplaunch/runner.py
  • You can also run the test suite by executing the nose test binary: - nosetests